
How to Take Better Travel Photos: 7 Travel Photography Tips for Beginners
This site uses affiliate links and I may earn a small commission when you use my links and make a purchase, at no extra cost to you.
Growing up, I always thought that being a photographer who traveled the world would be a DREAM JOB. Thirty-something years later, I still think that’s true! Unfortunately, travel photography is not my day job. Instead, it’s a side hobby – and that works for now. I’ve learned so much over the years and graduated from point-and-shoot cameras, to an entry level DSLR, and finally to a professional camera. I’m still learning but I’ve gotten lots of questions lately from readers about how to take better travel photos. In this guide, I’m sharing all of my best travel photography tips for beginners, so that you can improve your travel pictures and keep your travel memories for years to come!
I get a ton of questions about the photos on my blog. I do take many of them, but I also use stock photography to supplement my own photos. This saves me a ton of time (which means more free blog posts and info for you!).
That said, since this is a post about how to take better travel photos, I wanted to show you some of my own! All of the photos in this post are ones that I personally took during my travels around the world.
How to Take Better Travel Photos: What to Do Before You Leave Home
If you want to learn how to take better travel photos, start thinking about it before you even leave home! Seriously – preparation is everything.
Before you head out on a trip, there’s a few things you can do in advance that will have a big impact on how your travel photos turn out.
Start with the Right Photography Equipment
Don’t get me wrong – my iPhone can take amazing pictures. But if you really want to improve your travel photos, I recommend looking into some additional photography equipment.
For beginner travel photographers, I usually recommend starting with a mirrorless camera. What’s a mirrorless camera? You can read all about the details here, but the key takeaways are that mirrorless cameras are smaller and lighter than traditional DSLR cameras.
Many models are less expensive, too. So they’re a great entry point for beginner photographers who want to upgrade their equipment.
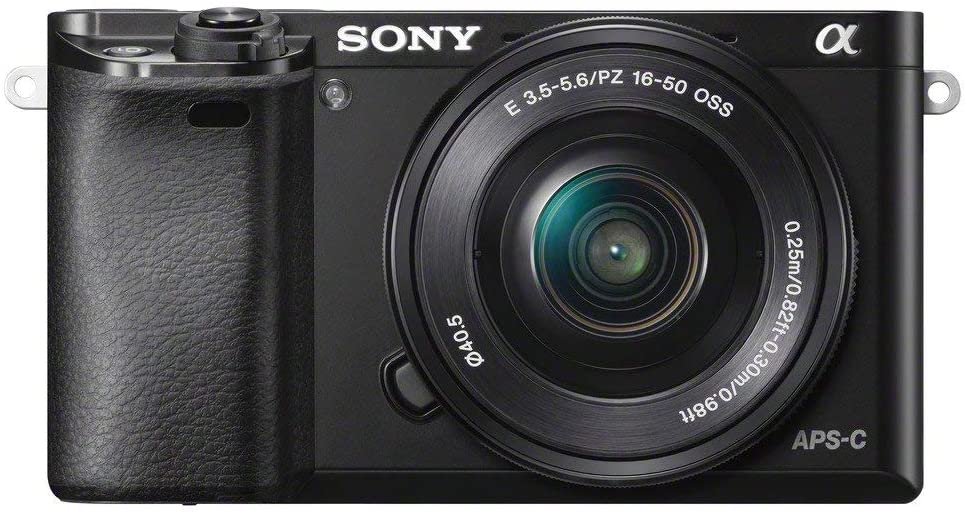
My Pick: The Best Mirrorless Camera for Beginners
If you’re a beginner and looking to upgrade your travel photography equipment, I recommend the Sony a6000.
This is a lightweight, but super powerful camera. Best of all? It’s at a great price point for beginners and will last you for years and years. You’ll be able to do a lot with this camera!
Rent Equipment for Your Trip
If you’re a beginner photographer, you definitely don’t need to OWN expensive photography equipment – especially if you’re only going to use it every once in a while.
So if you’d rather not invest in something new, you can rent equipment for your trip. Renting cameras and lenses online is a great alternative for buying the equipment yourself.
If you’re interested in scoping this out, check out this site which has great deals on renting both cameras and lenses.
By renting online, you also don’t have to worry about having your own gear damaged, lost or stolen, since you can purchase insurance to cover these kinds of unforeseen events. This is huge! Camera equipment is EXPENSIVE, so it’s really nice not to worry about losses or damage.
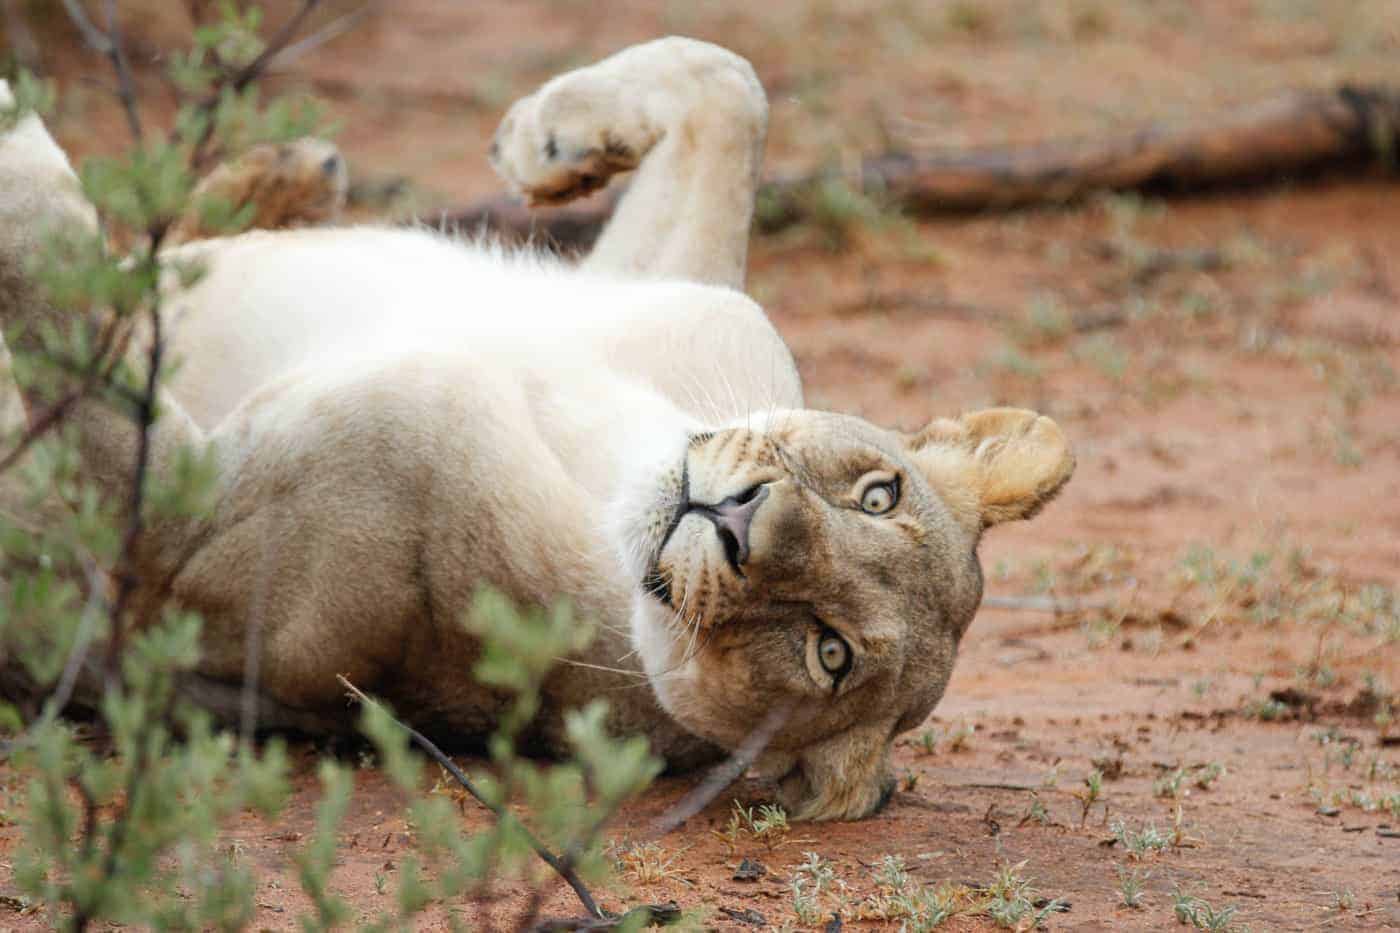
When I went on safari in South Africa, I rented a special zoom lens for my trip. Renting a lens was a fraction of the price of buying the same lens!
I took the photo above with that lens. Without a special zoom lens, I would have never gotten this amazing photo of a lioness!
Check out online classes to brush up on your skills
In this post, I”m sharing some of my favorite travel photography tips for beginners, but did you know that you can learn a ton of amazing tips for travel photography online? Way, way more than I could ever incorporate into a single blog post. Check out this course which is pretty amazing, specific to travel photography, and covers all of the basics.
It’s an investment, but when you think about how much you’re already spending on travel, it’s an investment that will allow you to get more out of your trip. I look back on trips from years ago and wish I’d invested in learning more photography skills earlier on!
Pack the essential photo equipment
Don’t forget to pack the charger for your camera, and an extra battery! Also, you’ll probably need an adapter if you’re traveling abroad, so don’t forget that, either.
It’s also a good idea to always bring extra memory cards. These are what I always buy – they come in a bunch of different sizes and are a great value online.
Seven Tips for Amazing Travel Photography
Now that you’ve got all the right gear packed, let’s get rolling with some travel photography tips for beginners!
Start with great photo composition
Composition refers to where in a photo your subject is placed, and it’s the first thing to consider when it comes to perfecting your photo skills. Have you heard of the rule of thirds? It’s a great general guide for composition of photos, and also a great tip for travel photography.
Imagine a photo being divided into nine equal pieces, just like a tic tac toe board. You can read more about it here, but essentially placing the main subject of your image where two of the lines intersect makes for a visually compelling photograph.
It’s natural to want to center the subject of your photo, and this works often, but try playing around with the rule of thirds, and I think you’ll find that it makes a difference!
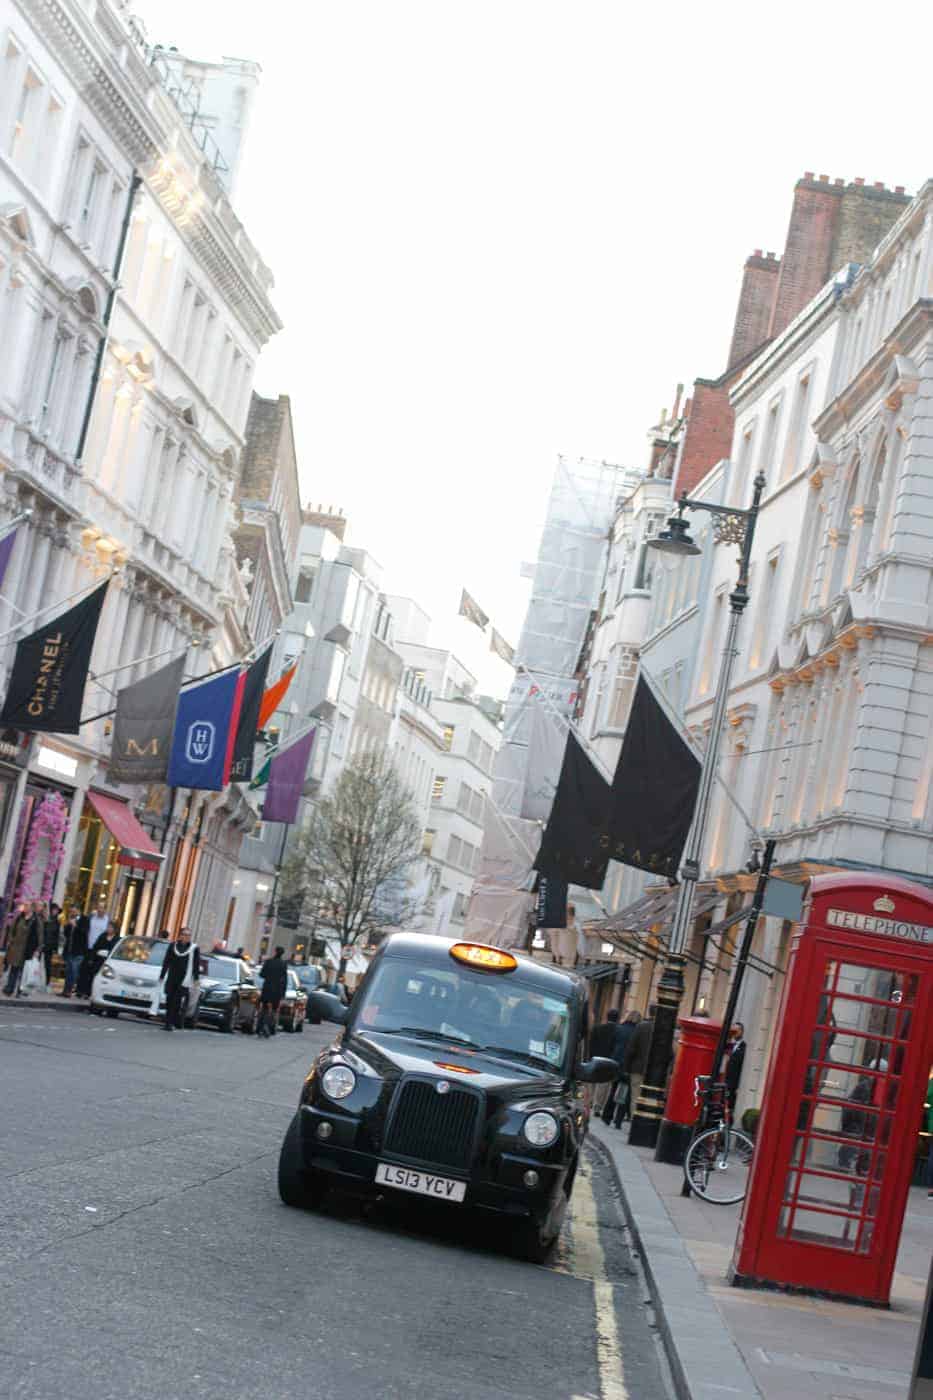
In the above photo, I used the rule of thirds to roughly place the London black cab in a position where your eyes are easily drawn to it. I also used the concept of leading lines, which you can read more about here – but it’s a technique that utilizes existing lines (the curbs of the road in this case) to draw your eye to the main subject of your photo.
Both of these tools are very valuable techniques for beginners who want to improve their travel photography!
Incorporate People into your photos
Nothing captures the culture of a destination like the people that live there, so one of my favorite travel photography tips for beginners is to include locals in your photos. This will elevate your pictures to another level.
This is one place where it can really help to have a zoom lens – it can obviously be awkward to snap a stranger from just a few feet away!
I always try to be respectful of people’s privacy and ask for permission before I take their photo – but sometimes there are situations where that’s not possible. When I’m photographing out in a public place, I don’t get too worried if I can’t ask permission – since I don’t sell any of my photos – but if you do, you’ll need to think about photo releases.
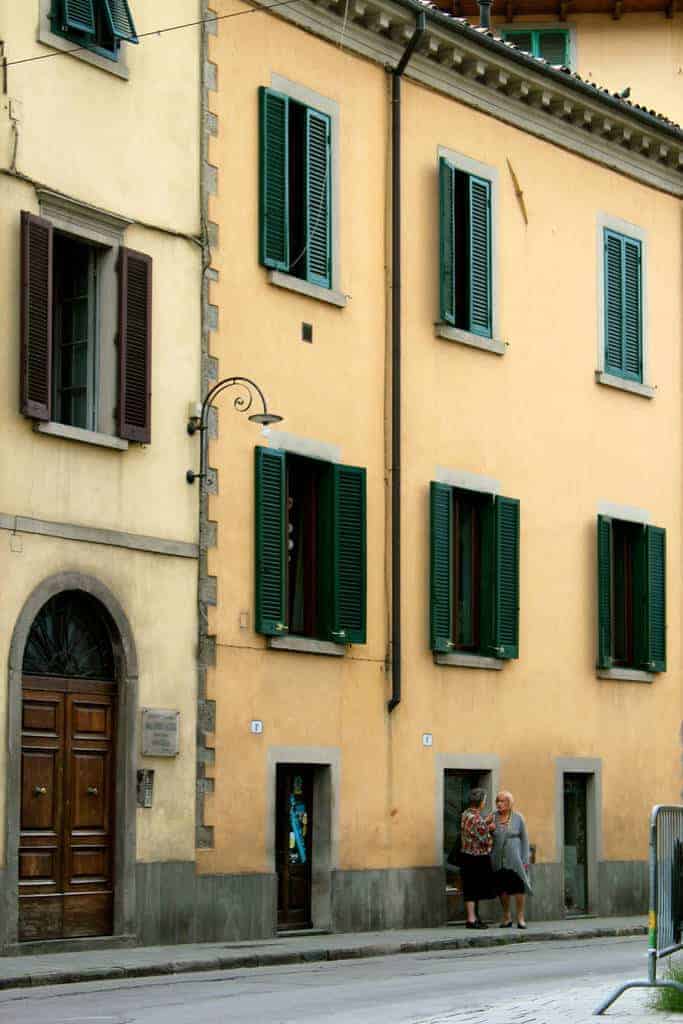
I captured this moment in a tiny town in Italy, where two women were catching up with each other on the street. I only wish I could have understood what they were saying! But to me, this photo perfectly captured the spirit of this little village where everyone knew one another.
Chase the best light during golden hour
What’s golden hour? It’s the very first hour after the sun rises and the very last hour before the sun sets – and it’s a photographer’s favorite time of day!
This is when the sun is low enough in the sky that the light is really soft, and you can get that dreamy, lovely warm look in your photos – or golden, I suppose you could say!
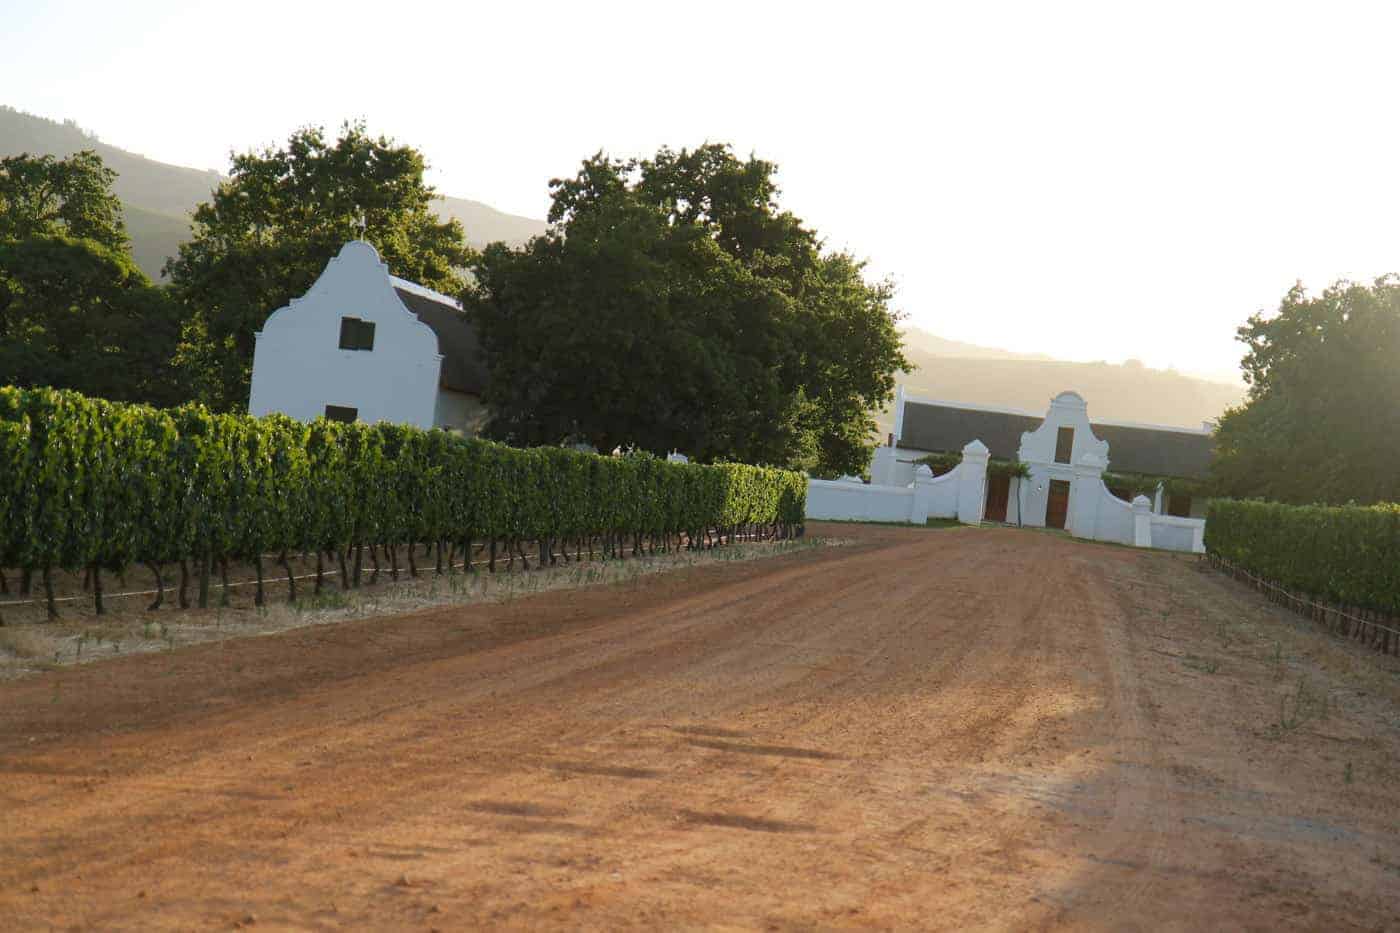
When I’m traveling I often try to save my most-anticipated photo sights for golden hour, so that I can have the best lighting possible when I’m there. I took the photo above just before sunset at Babylonstoren hotel in South Africa, and I love the dreamy, golden sunlight that I was able to capture.
If You’re a Beginner Travel Photographer, Find an Unusual angle
Photos taken straight-on and at eye level are the most commonly-seen perspectives in travel photography. And there’s nothing wrong with that!
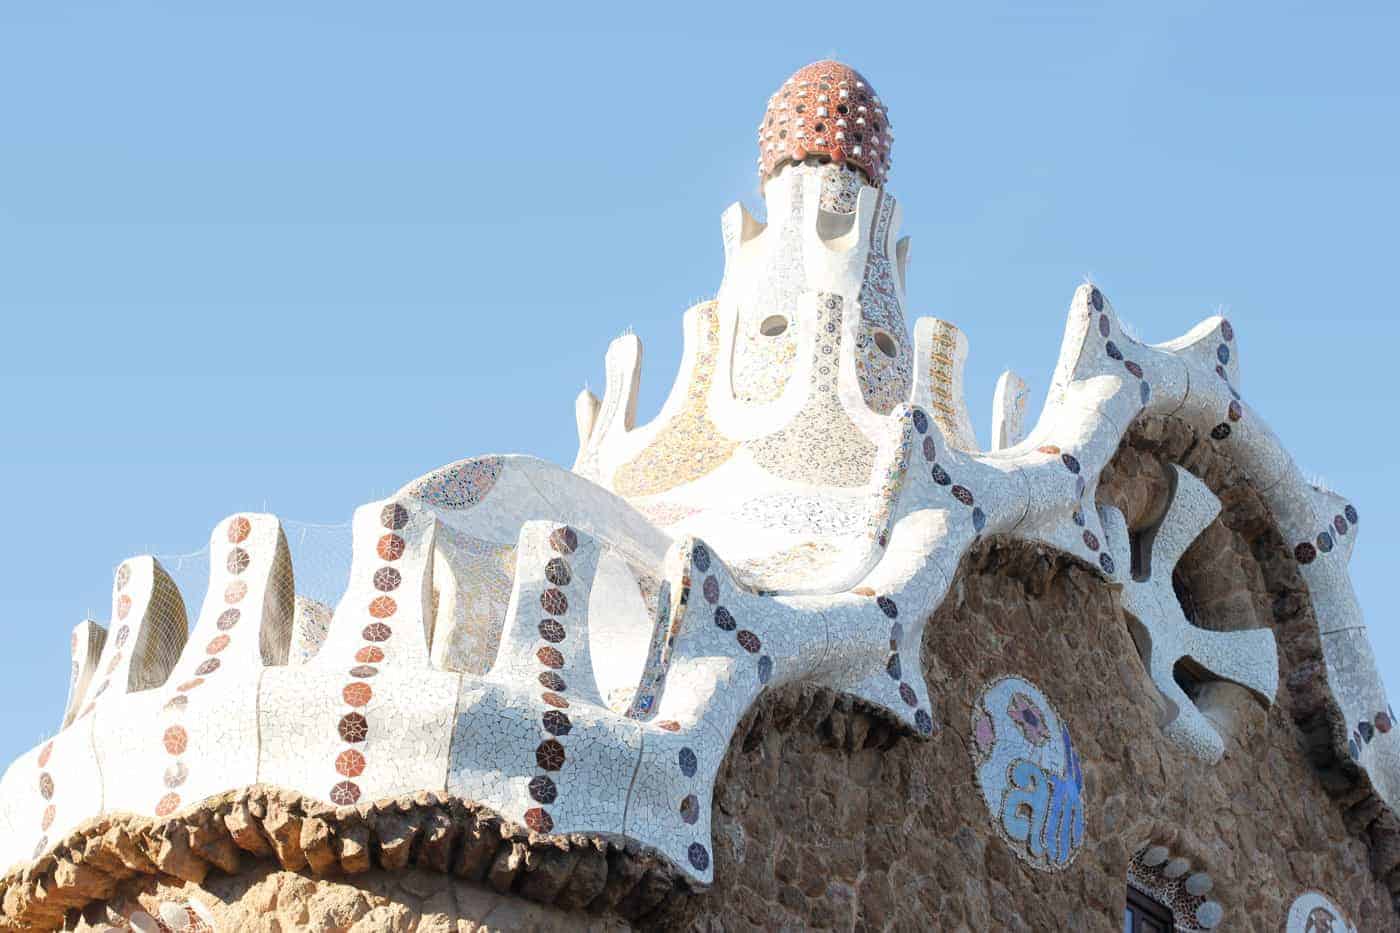
But try thinking outside the box a bit when it comes to perspective. Point your lens straight up or straight down and see how it changes your image.
Stand up high or get down low – get close up, or move far, far away. You’ll be amazed at how different things can look when you vary your perspective.
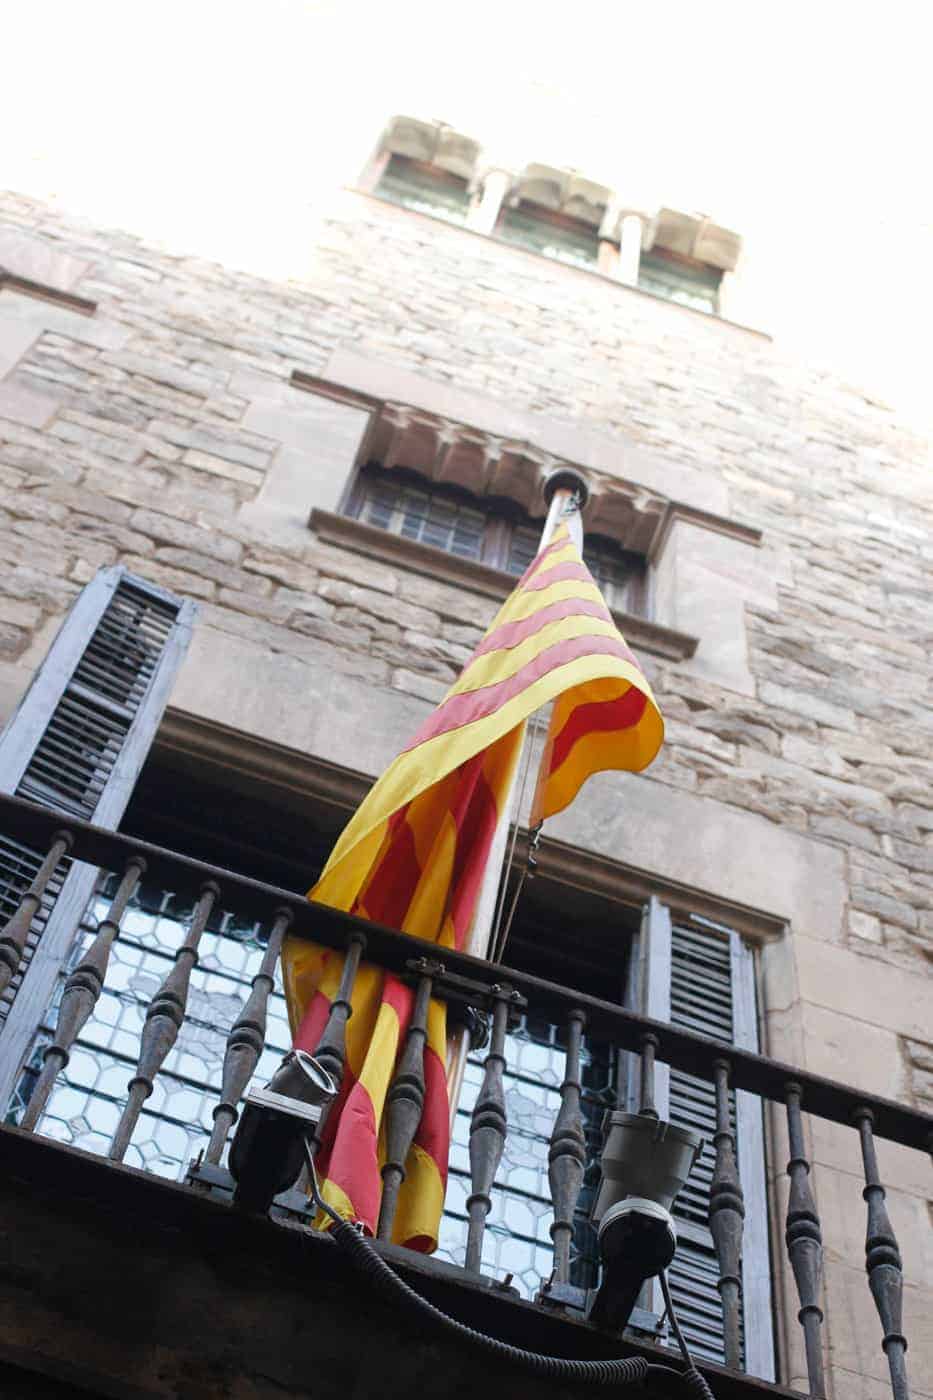
In the photo above, I was wandering the streets of Barcelona, and the view looking straight up was so captivating! I loved this photo more than any of the others I took from a straight-on perspective.
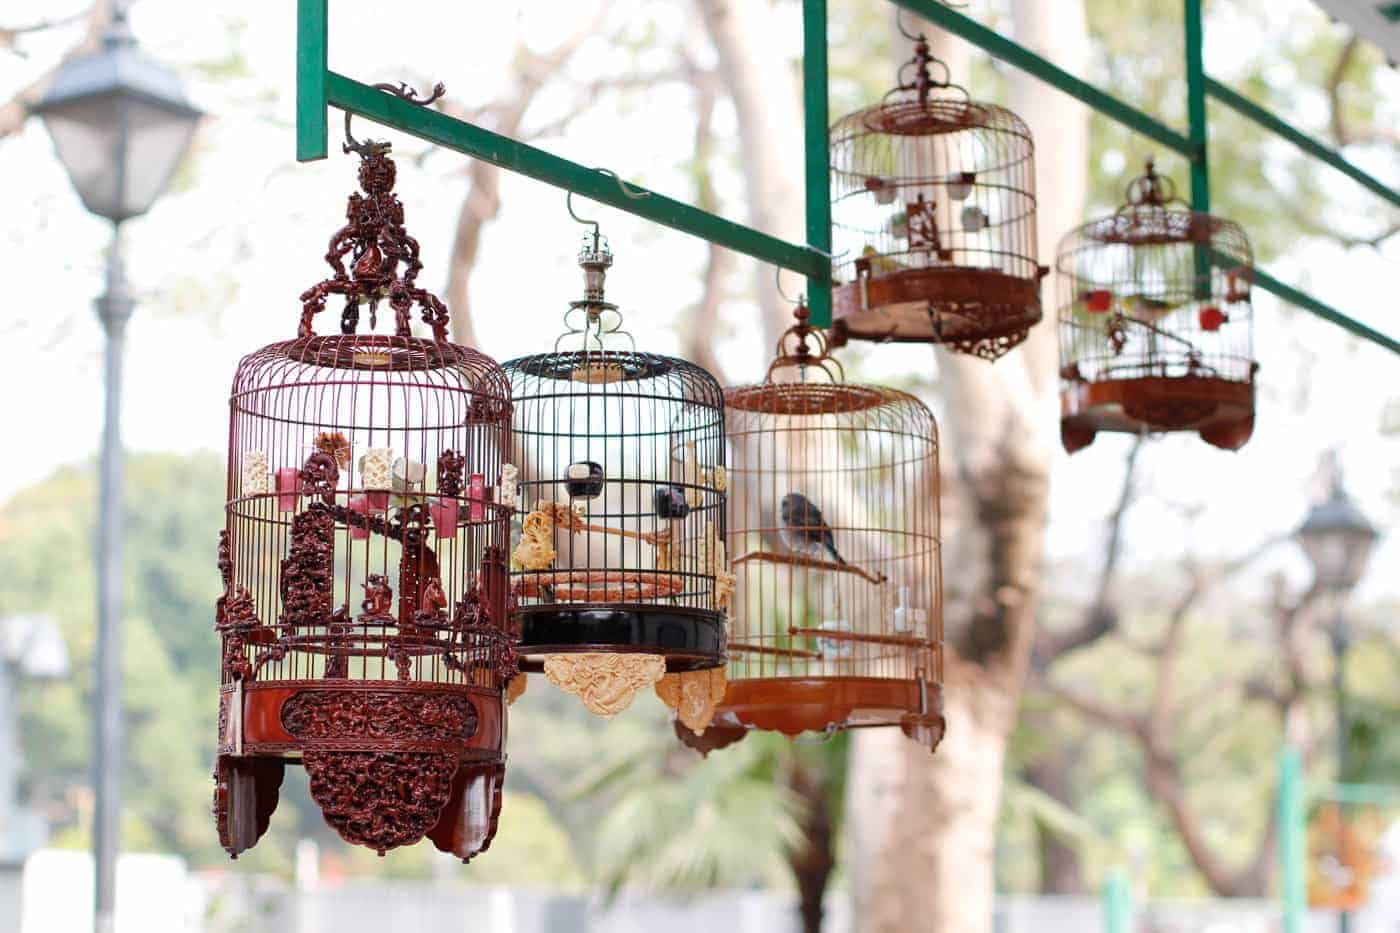
Look for the little details that best capture a destination
It’s tempting to want to capture the amazing scenery that’s undoubtedly surrounding you while you’re traveling – and you absolutely should!
But some of my favorite, most memorable travel photos are the ones that capture the little details of a destination. A close-up of a building, food in a street stall, or a detail of interior decor are all examples of details that can make for great travel photos.
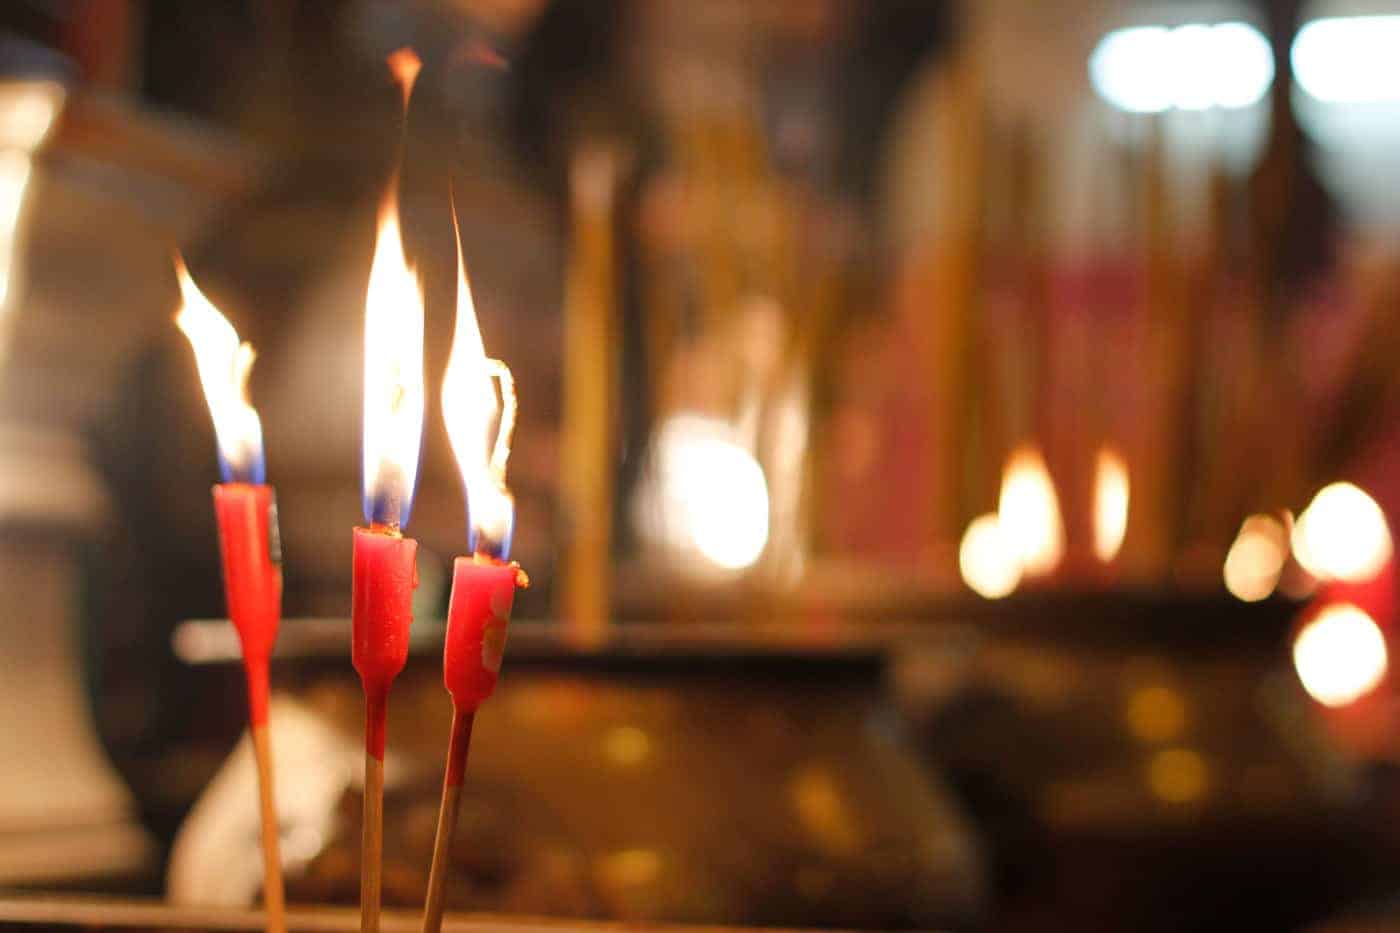
I took the shot above at a temple in Hong Kong , and it’s one of my favorites from my trip there a few years ago. When you think of photos of Hong Kong, you typically think of landscape shots of the harbor and the skyline – but to me, this shot captured a layer of culture beneath what you can see on the surface.
These kinds of shots really add variety to your photos overall, and they’re often the most unique!
Shoot into the sun
Traditional photography teaches that, as the photographer, you should place yourself between the sun and your subject, with the sun at your back.
Call me a rule-breaker, but I rarely ever do this! Why? I feel like sunlight adds so much emotion to photos, so that means I’m usually shooting directly towards the sun when I take pictures.
This takes some practice, but it helps if you’re shooting during golden hour, and if the sunlight is filtered through something. For example – tree branches, flowers, or someone’s hair.
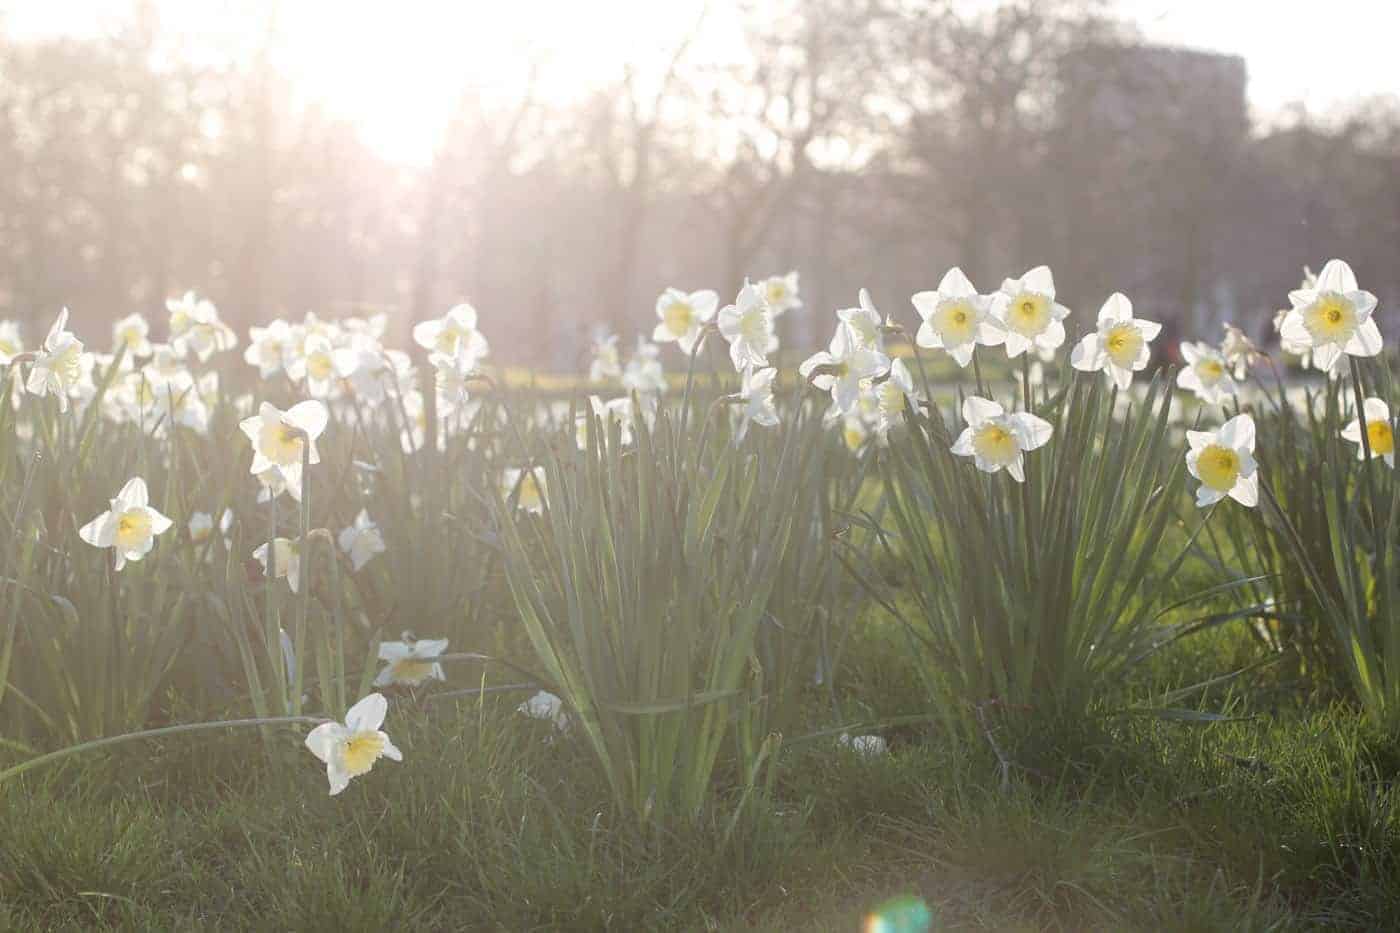
I took the photo above at Regent’s Park in London. I loved how the sunlight was coming through the tree branches – and it perfectly illuminated the spring blooms!
For amazing travel photos, visit popular places first thing in the morning
This is an important travel photography tip for beginners!
Ever wanted to have the Grand Canyon, Ko Phi Phi, or the Great Wall of China all to yourself? Get there first thing in the morning! Dawn is preferable so that you can capture golden hour, but the earlier, the better!
There’s nothing like trying to fight through the masses to get your perfect shot, or having groups of total strangers appear in the serene photo you were trying to compose. It gets frustrating!
If one of your main objectives is to improve your travel photos, then being strategic about the time of day that you visit is a must. It’s also one way that being jet-lagged can actually pay off – chances are you might be wide awake at 5am anyways!
Tips for Travel Photography Once you’re back home
Once you’re back home, don’t forget to make the most of your photos by actually getting them off your camera and onto your wall!
I have always used Shutterfly for my prints and highly recommend them.
subscribe
Pack like a pro with these free printables!
- Carry on packing list
- Travel outfit
- Pre-travel checklist


I am always looking for tips to improve my photography. i like the one about paying attention to the details and taking different angles. this post was very useful.
So glad it was helpful! I really love the detail shots in particular – I think they bring out so much of the character in a place!
Great tips – lighting is everything. I’m so not a morning person, but I’m trying to be as I know it’s the best time to avoid crowds and get the best lighting.
Haha, I know, me too! I need to take my own advice more often, lol. I’m a sure thing for golden hour at sunset but sunrise is a totally different story!
I’ve been trying to improve my photography and these tips are awesome!! I definitely haven’t ever thought about renting a camera but that’s such a good idea! I also haven’t shot into the sunlight but your photos really did turn out great. I’ll keep it in mind next time!
Oh good, I’m so glad it was helpful! My safari trip was the first time I’ve ever rented camera equipment and it was hands-down the best investment I made.